
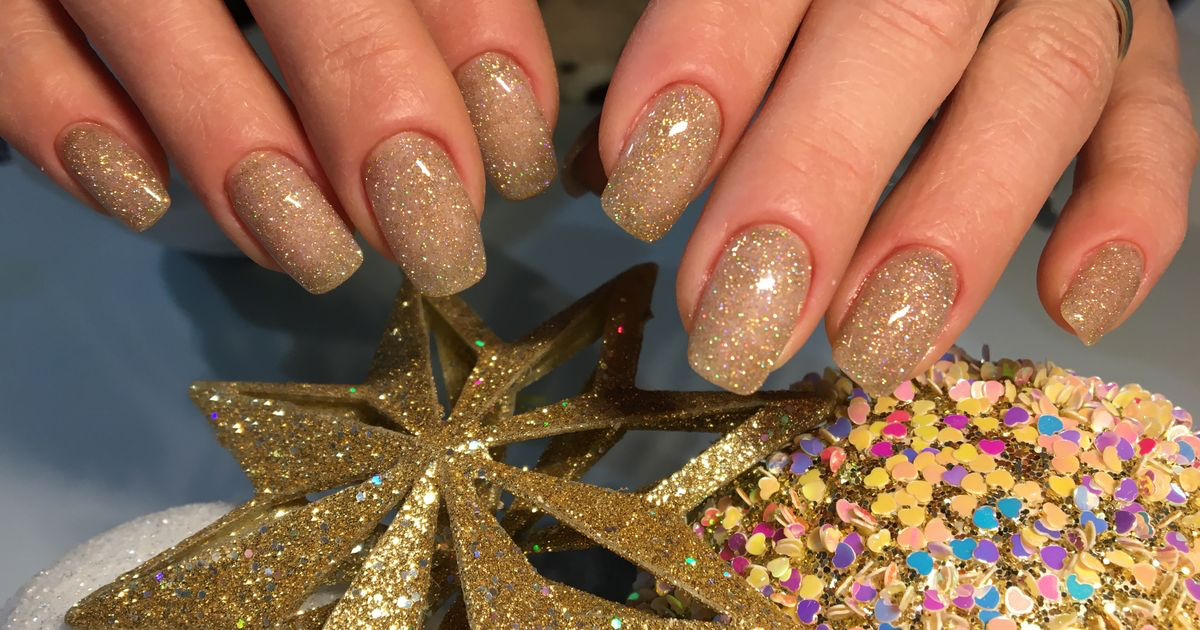
How to Photograph Glitter Nails
Quick answer: Photograph glitter nails with one small, hard light rather than soft window light, because sparkle needs a point source to bounce off. Keep the phone still, move the hand slightly between frames to catch different flakes firing, shoot against a dark background, and take a short video as well as stills.
Glitter is the finish clients ask for in person and never book from your feed. In the chair the set throws light in every direction as their hand moves. In the photo it is a beige nail with some dust on it. Everything that makes glitter worth the money happens in motion, and a still photo has none.
Why does glitter look flat in photos?
Each flake only fires when the angle between the light, the flake and your lens is exactly right, and a photo freezes one angle.
A glitter gel is thousands of tiny mirrors suspended at random angles in a clear medium. Any given flake reflects a bright pinpoint at one narrow angle and looks like a dull grey speck at every other. When the client turns their hand, different flakes hit that angle in turn, and the reshuffling is what you read as sparkle.
Your camera gets one instant of that. Only a small share of the flakes are firing when you press the button, and the rest record as flat grey specks, which is why a photographed glitter set looks slightly dirty rather than sparkly.
Soft light makes it worse. A big window spreads light across so wide a range of angles that no single flake gets a strong enough hit to blow out into a proper highlight.
What lighting makes glitter sparkle on camera?
Small and hard, which is the opposite of what almost every nail photography guide recommends.
A bare bulb, a desk lamp with the shade off, or a phone torch held at arm's length all work. The smaller the source, the narrower the cone of angles it fires from, and the more sharply defined each highlight is when a flake catches it.
Direct sun through a window is excellent for glitter. It is hard, free, and produces the crispest sparkle you will get on a phone. The same sun that ruins a matte set is what a glitter set needs.
Put the light low, roughly level with the hand, and off to the side. Then move the hand in small increments and shoot as you go rather than posing once and taking five identical frames, because rotating the wrist five degrees changes which flakes fire.
This is the one finish where the soft daylight in best lighting for nail photos is the wrong starting point.
Should the overhead salon light go off?
Yes, or at least dim it. Ambient fill raises the brightness of the parts not sparkling, reducing the contrast between a firing flake and the surface around it. Sparkle is a contrast effect, so anything that lifts the base of the nail eats into it.
Should you shoot glitter as a photo or a video?
Both, and lead with the video.
Glitter is the strongest argument for filming a set rather than photographing it. A three-second clip of a hand rotating slowly under a hard light shows the finish doing the thing that sells it.
Film it in slow motion if your phone offers it. Sparkle is fast, and half-speed playback gives the eye time to register individual flakes firing. Then pull the still from the clip and treat it as the grid cover rather than the whole story, as in reels ideas for nail techs.
What background works best for glitter nails?
Dark, plain and matte, because sparkle reads as brightness against darkness. Put a glitter set on a white towel and the highlights have nowhere to go: the background is already at the top of the brightness range and no flake can out-shine it. On charcoal or deep navy, every firing flake becomes a distinct bright point.
Keep it matte too. A shiny surface produces its own competing reflections and the photo ends up busy. A folded dark cotton towel or black card is enough, and the general tonal-gap logic sits in best background for nail photos. Avoid texture or pattern, because glitter is already a high-detail subject.
Why does my glitter photo look grainy instead of sparkly?
Grain and glitter are the same thing as far as your phone is concerned, and several steps in the chain try to remove one and remove both.
Two problems stack. If the room is dim your phone raises its sensitivity and generates real noise, which mixes with the sparkle and makes the nail look sandy. And every automatic smoothing step, whether phone processing, a filter, or Instagram's upload compression, treats small random bright specks as something to tidy away. The result is a photo that had sparkle in the camera roll and mush on the grid.
Shoot bright, avoid pinching to zoom, and keep noise reduction low on anything with shimmer. The full explanation is in why do my nail photos look grainy.
How do you edit glitter nails without flattening them?
Work with contrast and shadow depth, and go carefully with anything that smooths or lifts the whole frame at once.
| Option | Sparkle kept | Colour accuracy on glitter gel | Time per photo | Cost |
|---|---|---|---|---|
| Straight out of the phone camera | Partly, phone processing smooths some away | Shifts under salon bulbs | None | Free |
| Instagram or TikTok filters | Poor, most crush the highlights | Poor, glitter tones drift | Seconds | Free |
| Lightroom or Photoshop on a desktop | Excellent with careful local work | Excellent | 5 to 15 minutes | Subscription |
| NailTech on your phone | Good, tuned for nail surfaces | Built for gel shades | About a minute | App purchase |
Whichever you use, the moves are the same. Pull the shadows down so unlit flakes go darker and the firing ones stand out, add a little contrast, and leave noise reduction alone. Resist raising brightness across the whole photo, because that lifts the dull flakes as much as the bright ones. That order, shadows before brightness, holds for every finish and is set out in editing nail photos.
A two-minute setup for a glitter set
- Turn the overhead light off and bring in one small hard source, a bare desk lamp or direct sun.
- Put a dark matte cloth down so each firing flake has something to be bright against.
- Get the light low and to the side, roughly level with the hand.
- Rotate the wrist a few degrees between frames and shoot ten, because different flakes fire each time.
- Film three seconds of slow rotation in slow motion before the client moves their hand away.
Where NailTech fits in
Sparkle survives the camera badly, editing badly, and upload compression worst of all, because each of those steps contains something built to smooth small random bright specks out of a picture. Editing a glitter set is mostly an exercise in restraint, and general photo apps make restraint hard: default processing smooths, filters crush highlights, and brightness sliders lift the dull flakes as eagerly as the lit ones.
NailTech is a nail image editor, so it starts from the assumption that the detail on the plate is the point.
- Deepen the shadows so the flakes that fired stand out from the ones that did not.
- Correct the warm cast a bare bulb leaves while keeping the glitter tone true.
- Keep skin even without the smoothing that erases sparkle nearby.
- Clean the background so a dark cloth reads as deliberate rather than as a dim corner.
NailTech works with the flakes that fired. Getting more of them to fire is what step four is for.
Only a small share of the flakes in a glitter gel are firing at the moment you press the button, which is why ten frames with the wrist rotated slightly between each one beats five frames of a perfectly held pose.
Make your nail photos look salon-ready
Download NailTech and clean up the lighting, skin tone and background on every set you post, in a few taps.
Download on App StoreFrequently Asked Questions
Why does glitter not show up in nail photos?
Glitter does not show up in nail photos because each flake reflects light back to the lens only at one narrow angle, and a photo captures a single instant. Most flakes record as dull grey specks rather than bright points. Motion is what creates sparkle in person, and a still image contains none of it.
What lighting is best for glitter nails?
A small hard light source is best for glitter nails, such as a bare desk lamp, a phone torch, or direct sunlight through a window. Small sources produce sharply defined highlights when a flake catches them. Large soft sources like an overcast window spread light too widely and give a dull uniform shimmer instead.
What colour background should glitter nails be photographed on?
Glitter nails should be photographed on a dark, plain, matte background such as charcoal or deep navy cloth. Sparkle reads as brightness against darkness, so a white background gives the highlights nothing to stand out against. A matte surface also avoids competing reflections that make the frame look busy.
Should you film glitter nails instead of photographing them?
Filming glitter nails is more effective than photographing them, because sparkle depends on motion that a still image cannot contain. A three-second clip of a hand rotating slowly under a hard light, ideally in slow motion, shows the finish working. Pull a still frame from the clip for the grid cover.
Final Takeaways
- Use a small hard light, because glitter needs a point source and soft light kills it.
- Go dark on the background so each firing flake has something to be bright against.
- Move the hand between frames and shoot ten, since different flakes fire each time.
- Film a slow rotation as well, because sparkle is a motion effect first.
- Keep noise reduction off, as software cannot tell glitter apart from grain.
- Deepen shadows rather than raising brightness, which lifts the dull flakes too.

Hannah
Hannah is a co-founder of NailTech, the nail image editor that turns quick phone shots into portfolio photos. She worked in the beauty industry before moving into mobile design, and now owns product and design on the app.



